The starting costs for someone to do it professionally that I’ve come across range are ~$US150 offered by Michael Campbell, on the forums in lulu.com (where I have also published my novels in print and as PDF ebooks), and from lulu where prices to convert your book to epub format appear to go in increments of $US100 per 250 pages (eg $US99 for 250 pages or less, $US199 for 251 to 500 pages and so on. And with a time scale of 4-6 weeks, which I think is ridiculous for what is essentially a few hours work.) As I’ve said, these are the starting prices for a basic paperback-type novel. Books with more demanding formats and images will cost more. If money is no objection then one of these services would be the best option, particularly if you can include the option of getting it into iBookstore or one of the other online stores that use epub-based ebooks as well. For example, lulu offers this service for epub books.
But if you don’t want to pay any money, there are other options, but from what I’ve read on lulu’s forums and from my own experience, they don’t work well. I haven’t tried the online sites, but I’ve tried Calibre to convert a novel in PDF, Open Office, HTML and RTF formats to the epub format, and Anthenium eCub for Word documents.
Calibre doesn’t convert Word documents (which seems a serious omission to me) but I couldn’t get a complete or even reasonable conversion out of it. For a start I couldn’t get it to produce a Table of Contents for any of the formats. Well, to be honest, I didn’t get a conversion from an ODT file. The jobs kept taking longer than 30 minutes, and seemed to be stuck at 47% conversion, so I killed them. This was the case even after I went through and tidied up the document, paragraph and style-wise. PDF was quick, but the result was a mess. The HTML and RTF conversions of files saved as from the Open Office document also only took around 3 minutes. Neither had a Table of Contents, although I managed to get the actual text reasonably close to that in the printed novel by playing with the conversion options. This was after I did the massive cleanup of paragraph styles. My original manuscript was written in Word 2000 and I had switched to open office as it had a PDF save as option.
Little did I know Word 2000 would give so many paragraph styles to my paragraphs without bothering to ask me.
eCub fared better. It gave me a Table of Contents, only there must have been over a hundred entries, of which most were blank, before my prologue, 44 chapters and epilogue showed up at the end. By that, I mean at the end of table of content entries in the TOC file. After loading the resulting epub file into both Calibre and Adobe Digital Editions, both showed a Table of Contents, but with blank entries and I couldn’t scroll down to the actual chapter entries. Other than that, it did a reasonable job, given the limited options it offered.
Now, I’m not an expert on either of these applications and it may well be that, given that I didn’t pay any attention to paragraph styles and options when I wrote the manuscript in Word, there may well be some weird junk within the DOC file that carried through to Open Office and which may have caused the poor results in these applications. But since I’ve read of poor results from some of the online options, I’m inclined to think that I’m not a once-off case, given that these sites may well use the same conversion engines as Calibre and eCub do.
As it was, after a lot of messing around, I decided to go the manual route and convert my novels myself. Fortunately, I know a little about xhtml and CSS, having created my website by hand.
So, without further ado, here are the steps. This is for a word document. I couldn’t find a way in Open Office’s Write to search and replace an end-of-paragraph marker.
Manual Conversion of a Word Document to epub Format.
This is for a novel manuscript (like a paperback novel) with no images, which is in a word document. Ideally, if it is double spaced, convert it to single space. The manuscripts I worked from were prepared for conversion to PDF for printing on lulu.com.Googling for epub creation will bring you to Jedisaber’s tutorial and he is linked to from a number of sites as well, but his tutorial isn’t really a tutorial, it’s just a list of all the files required and some information about them. On top of that, the sample zip file he provides doesn’t cut it with the epubcheck program which any epub file has to pass to get into iBookstore. My sample zips are based on his file and I follow his conventions, but they pass muster with epubcheck:
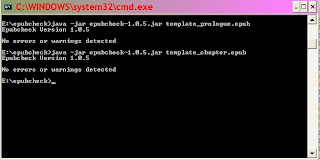
You can get the three zip files I’ve mentioned here and below from these links:
template, template_prologue, template_chapter.
So let’s look at a novel manuscript that has been prepared for self-publishing. Typically, you will have a title and author page, a copyright page (possibly including ISBN information) and perhaps some additional information on those or other pages at the start, such as other books you have written or something about yourself, your website etc. Perhaps you will have a Table of Contents and some other odds and sods. Then you have the novel itself, starting with a prologue perhaps, then the chapters, and ending possibly with epilogue. Each chapter may have its own title or just be Chapter One for example. For the purposes of this tutorial, my manuscripts have a title page (Title and Author) and a copyright page followed by the chapters titled as CHAPTER 1, CHAPTER 2 etc.
In each scene within a chapter the first paragraph is not indented, but the following are, and each scene is separated by * * * unless the scene ends at the end of the chapter (obviously). And that’s it. Most novels are fairly straight forward when you look at them and the only other things to consider are italics and possibly bolded text.
The conversion process is to:
- Prepare your word document to be in xhtml format.
- Convert to text using UTF-8 unicode.
- Edit the text file to complete the xhtml formatting.
- Separate out the title page, copyright page and chapter sections and insert them into individual xhtml files.
- Create a content.opf file and a table of contents file - toc.ncx.
- Create a directory for your epub book and populate it with the required files and directories, including your xhtml files.
- Zip up the contents of that directory in YourNovel.zip and rename it to YourNovel.epub.
- Check your new epub file with epubcheck.
Plus! To help, I will provide a couple of template zip files (see above) that will save you a lot of time and angst. So let’s get to it.
Manuscript Preparation
1. Lulu.com reckons they have to strip out the headers and footers, but actually, you don’t have to do this as their contents are not saved to the plain text file you will create. I did this step, because I didn’t know I didn’t have to … if that makes sense.
2. Delete excess blank lines such as those you may have used to position text in the copyright page, but leave the blank lines that indicate scene breaks or where you want paragraphs separated. In an epub file your page formatting will no longer apply so using blank lines to position paragraphs at the bottom of a page is meaningless. This also includes blank lines at the start of chapters to position the chapter title (if you didn’t use the title’s paragraph style to specify before and after spacing). Things like dot points and tables are not in the scope of this tutorial and you will have to write your own html for those.
3. Put paragraph tags around every paragraph (including your blank lines). To do this, bring up the Search and Replace dialog box (you should know how) and type ^p in the Find what: box and </p>^p<p> in the Replace with: box. Click in Replace All. For those who don’t know any html <p> is the open paragraph html tag and </p> is the close paragraph tag. Web browsers use those to determine what text is with a paragraph. Any formatting, like blank lines, indentation and centering etc, is removed and paragraphs are separated by a blank line (more about controlling that later).
4. Tidy up the paragraph tags: type <p> at the start of the document and </p> at the end because the search and replaced won’t have created those.
5. For your chapter titles, you can turn those into headers with header tags. I use h3 but you can use h1 to h6 and they each have different default actions where h1 is the largest and h6 the smallest. All you need to do is go to the start of each chapter and change the <p> </p> pairs to <h3> and </h3> or <h1> </h1> or whatever you want.
6. If you have italics or bold text, xhtml requires tags around each piece of text: <i> and </i> for italics, and <b> </b> for bold. Again, you can do this with Search and Replace. For example, to replace italicized text, put nothing in the Find what: box, but set the font to italics:
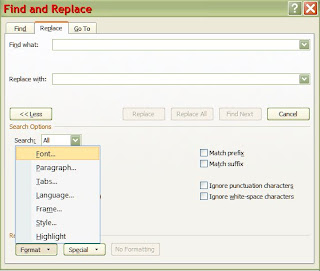
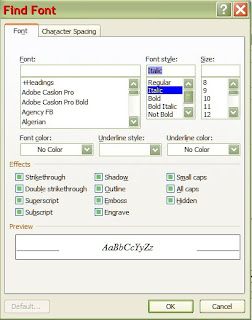
Clicking on font brings up the font dialog box and you just have to select Italic and then click OK:
In the Replace with: box type <i>^&</i> then click on the Format button, click on Font and select Regular to change the italics back to normal type, ie it’s not bold and it’s not italic. For those who don’t know, ^& means use the found text.
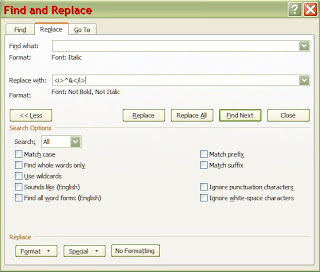
Clicking on Replace All should do the trick.
Some original text is shown here with the result of the change underneath.


7. There are some things to watch for during this step. XHTML is case-sensitive so all the tags need to be in lowercase. Word may make the <i> uppercase (<I>) in certain situations such as when just the word ‘I’ is in italics, so do a Match case search on <I> and </I> and change any that are found to <i> and </i> respectively.
I’ve also found in my manuscripts that if I have a whole line in italics, the end tag </i> may be placed after the line’s end-of-paragraph marker. To fix just search for </p>^p<p></i> and replace it with </i></p>^p<p>.
If you have several lines together that are in italics the </i> tag will only occur at the end of the last of these lines, you will need the italics tags around each line, eg
I know I think in italics.
It’s strange, but true.
Still, it’s better than thinking in underline!
Which becomes:
<p><i>I know I think in italics.</p>
<p>It’s strange, but true.</p>
<p>Still, it’s better than thinking in underline!</i></p>
And needs to be
<p><i>I know I think in italics.</i></p>
<p><i>It’s strange, but true.</i></p>
<p><i>Still, it’s better than thinking in underline!</i></p>
8. If you don’t want to indent the first paragraph of each chapter and scene then those paragraphs need to be differentiated from the other paragraphs. We do that by assigning them to a class, which will have a style of no text indenting assigned to it (more on this below.) I called this class BodyText as that was the style I used in word, but you can call it anything, so long as you also change it in the stylesheet.css file (provided in the zip files).
This is simple to do and there are three cases: chapter, scenes broken by a blank line, scenes broken with special text such as * * *.
For chapters, assuming you have marked them as a heading, say with h3 tags, you just need to search for </h3>^p<p> and replace with </h3>^p<p class="BodyText">.
For a blank line search for <p></p>^p<p> since your blank lines should be <p></p> pairs (unless you have blanks in them, which you shouldn’t) and replace with <p></p>^p<p class="BodyText">.
For * * * search for *</p>^p<p> and replace with *</p>^p<p class="BodyText">.
Warning! Check that the replace puts ordinary double quotes and not smart (curly) quotes, which has caught me out at times. If they are left as smart or curly quotes, when you save the document in plain text with UTF-8 encoding you will find they are replaced with the weird UTF-8 characters, which will cause you no end of problems. To convert smart quotes to ordinary quotes straight after typing, press Ctrl-Z.
9. For those scene breaks using special text such as * * *, ideally it should be centred. You can do this by assigning these paragraphs to a special class (I called mine Star) or you could make them a header, say h6 .
Again search for <p>* * * and replace with <p class="Star">* * *.
10. Create a plain text file via Save As and selecting Plain Text in the Save as type drop down list. Clicking on Save will bring up a file conversion dialog box and you need to click on the Other encoding radio box and then search for Unicode (UTF-8) in the list at the side.

11. Now you have a text file with curly quotes, em dashes, funny characters and other bits and pieces replaced with weird little character strings, which are the UTF-8 codes that epub requires. Now if you couldn’t get ordinary double quotes around BodyText and Star, then you have to fix up class=BodyText and class=Star. You can use notepad but I advise against it as notepad renders the UTF-8 strings as the characters they represent and I prefer to see the UTF-8 strings so that I can scan for ordinary quotes, double quotes that should have been curly in my word doc but weren’t, or if I had used a single dash instead of an em dash and so on. Besides there are better editors around. I use Turbo Pad which is free and allows you to open multiple files in tabs within the program.
Thus, in your text editor, search for class=BodyText and replace with class="BodyText" and similarly for class=Star.
12. Now you can split up your chapters and this is where the xhtml files in my template zip files can make life a lot easier. Download the appropriate zip file - template_prologue.zip or template_chapter.zip and extract out the contents into a suitable directory. You should now have two directories within your directory: META-INF and OEBPS. The files to change are in the OEBPS directory.
13. Open each chapter xhtml file, go to your plain text file, select all the text for that chapter and paste into the xhtml file just before the </body> tag. If you don’t want the chapter title I’ve provided in the xhtml file then delete that beforehand. Do this for all chapters, any prologue and epilogue. Near the top of each file there is also a Title line (with <title></title> tags around the title text) and you may want to change the title in that as well.
14. Delete any unused chapterXX.xhtml files, or, conversely, if you need more chapter files, copy an unused one and rename it. All you have to do then is change the title eg on the line with <title>Chapter 1</title> change to <title>Chapter 51</title> if you need a chapter 51. Change the CHAPTER 1 heading to CHAPTER 50 as well.
15. For the files you’ve deleted or added you need to update two files in the OEBPS directory: content.opf and toc.ncx. Both are text files.
content.opf contains the manifest of all the files in the OEBPS directory and the lines you need to add/delete are in the manifest, eg:
<item id="chapter44" href="chapter44.xhtml" media-type="application/xhtml+xml" />
And also in the spine:
<itemref idref="chapter44" />
If adding, copy the last chapter entries and update the chapter numbers, making sure you keep them in order.
16. toc.ncx contains the Table of Contents entries that the readers should use. This is a little more tricky for adding. In the file you will see groups of lines like
<navPoint id="chapter46" playOrder="47">
<navLabel>
<text>Chapter 46</text>
</navLabel>
<content src="chapter46.xhtml"/>
Each of these represents one Table of Contents entry. If removing, you need to delete (carefully) the sets of lines for the chapters you want to remove. Similarly, to add just copy and paste a set of these lines after the last chapter’s group and change the chapter number in the first, third and fifth lines and increment the playOrder number to the next playorder number. The playOrder numbers start at “1” for the first entry (Title page, which will either display Title and Author or the cover of your book) and must increase by one up to the last entry, ie your last chapter or Epilogue and without any gaps. So if you added another chapter after Chapter 46, the entries would be:
<navPoint id="chapter47" playOrder="48">
<navLabel>
<text>Chapter 47</text>
</navLabel>
<content src="chapter47.xhtml"/>
If your Chapters have titles like Chapter 47 - A Moron is Born, you can put that into the text area so that <text>Chapter 47</text> becomes <text>Chapter 47 - A Moron is Born </text> or even <text>A Moron is Born </text>. You can do this for all your chapters, id need be.
17. Now you need to update the metadata in content.opf. Metadata is information that reader programs will display about your novel. Open content.opf in your text editor and you will see lines like this:
<dc:title>TITLE</dc:title>
<dc:creator opf:file-as="Surname, First Names" opf:role="aut">Your Name</dc:creator>
<dc:language>en-US</dc:language>
<dc:publisher>XXXX</dc:publisher>
<dc:identifier id="BookId">urn:uuid:XXXX</dc:identifier>
<dc:description>
Your description. This will appear in Comments.
</dc:description>
<dc:subject>Tag 1</dc:subject>
<dc:subject>Tag 2</dc:subject>
<dc:subject>Tag 3</dc:subject>
Hopefully, most of what you need to update is self-explanatory, such as TITLE, Your name as author, description and tag entries in the subject lines (you can put in as many of these as you like). There is also a unique code that must go where the XXXX is after urn:uuid. If you have an ISBN number it will need a line like this:
<dc:identifier id="BookId" opf:scheme="ISBN">123456789X</dc:identifier>
otherwise I use something from my title plus a date and time stamp, eg fracture201005181049.
18. The content.opf I’ve provided is based on Jedisaber’s example, which contains a line
<item href="cover.jpg" id="cover" media-type="image/jpeg"/>
In the manifest. If you have a cover and want it shown instead of text in the first page (title_page.xhtml), copy your novel’s front cover into the OEBPS directory as a jpeg file and rename it to cover.jpg. You can resize it to smaller with higher compression for a smaller file if you want. If you don’t have a cover or don’t want to include one, then delete this line. I resized my covers to 775 x 1186 pixels by keeping the aspect ratio the same. You can resize to 600 x 800 as most readers seem to have that as their display size, although newer devices are starting to have higher resolutions. Any reader that displays the cover should do an automatic resize anyway. My covers looked okay.
19. If you don’t want a cover image for your title page, delete title_page.xhtml, then copy one of the original chapterXX.xhtml files, rename it to title_page.xhtml and put your title page text in there. (Remember to change the title as well.)
20. Next you will update the table of contents file. Open toc.ncx in your text editor and change XXX in the line
<meta name="dtb:uid" content="XXXX"/>
to the unique identifier you put against urn:uuid (or your ISBN number) in content.opf. Also change TITLE in the title line to your novel’s title.
21. Open copyright.xhtml in your text editor and update the copyright paragraph. If you don’t want this text in this layout or want to add extra text, create a document for it and follow the steps as for converting a chapter. Then replace that plain text content over all the lines between <body> and the </body> lines.
22. Finally, you need to change stylesheet.css to what you want. If you’ve followed my conventions you don’t have to change anything. Note that my h3 has a top margin of 3em. That means 3 lines. I modified Jedisabre’s original page_template.xpgt which Adobe’sDigital Editions used for its “page” layout. That set margins for each chapter to 6 lines, but is ignored by other readers, so I set them to zero so I could have the same margin in all readers. If you want more lines, change the 3 em entry in the css file.
I won’t go into css coding as that’s a whole other area, however, if you want a serif-type font, the line with /* and */ at either end is a commented line for a serif font. If you want to use that then delete the Verdana font line above and remove the /* and */ from the Georgia line. You can also change Georgia to "Times New Roman" or whatever if you know what your font should be. Note that I haven’t embedded my fonts. Several sites I’ve looked at don’t recommend this and if you use common fonts, like Georgia or Verdana, then it shouldn’t be a problem.
23. At last, you can create the epub file. I like to start off with a partly prepared zip file (template.zip) and all you have to do is open it and drag in the OEBPS directory, using normal compression. You could replace the files in the OEBPS directory in the chapter_template.epub (if you used that) but I sometimes had problems with that. Rename template.zip to YourNovel.epub. It might be a good idea to keep a copy of template.zip so you can use that again after you have fixed any errors rather than modifying your epub file.
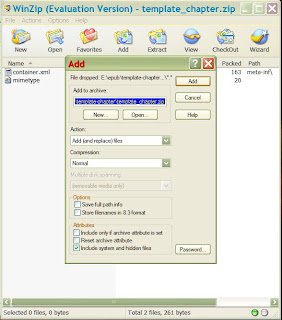
24. Now you are ready to check your epub file. The template zips were created with winzip in Windows XP and they pass epubcheck. Zip files created/modified with different zip programs may not work. 7Zip definitely doesn’t and I don’t know about Vista’s or Windows 7’s inbuilt zipping utilities or any of linux or apple’s zip programs. The easiest way to use epubcheck (and assuming you have installed it on your PC) is to copy your epub file to the epubcheck directory and then open up a command window (using Start>Run). Type in cmd and press enter. Change to the epub directory (mine is on the e: drive as e:\epubcheck – nice and simple) and type in the command
java –jar epubcheck-1.0.5.jar YourNovel.epub
1.0.5 is the current version of epubcheck at this time. Change this to the version you downloaded if it is later.
It appears that not all zip files are the same and epubcheck is very fussy, especially with zip file header records. If you get errors that suggest that the file name, directory name or drive label are incorrect, or that the first filename in the zip file must have length of 8 but is a different number, then your zip utility writes the header record in a different way or it doesn’t store the files in the order epubcheck expects. If you can, get winzip. It’s not free but you can get an evaluation version to try.
If you get other errors, they will be errors in your conversion of your chapter text or editing errors in the specified files. An online search of those errors should provide answers.
EPUB Readers
I’ve tested my epub files in Adobe’s Digital Editions, Callibre and Stanza Desktop. Digital Editions looks the best. The font is very clear and the page is bright and crisp.
The only thing of concern I’ve found is from when I changed the font size to 11pt, the same as in my novels. Originally I had my font setting in stylesheet.css set to 65%, which came out about the same in both Digital Editions and Callibre, but this depends on the default setting of what 1 em (character size) is in each reader and I don’t know if it’s standard across all readers, whereas using points (pt) should be (I hope). With the 65% setting, both Digital Editions and Callibre let me change the font size up and down. When I changed to pt, Digital Editions font size changing stopped working, but Callibre’s didn’t. I guess it just goes to show that you can’t assume that all readers will act the same.
Both Callibre and Stanza Desktop allow you to change fonts, but Callibre does it without losing your layout and other formatting.
Stanza Desktop, which is currently in beta release (ie it should be close to a production release) is, well to put it bluntly, terrible. At least its reader is. I can’t say anything about the rest, but the reader comes across as a quick and dirty, rushed attempt. All your layout and styling is lost, including your fonts. Stanza’s website even admits in its FAQ page that it deliberately removes any formatting, such as dot points and tables, all, it proudly proclaims, so that the reader can choose the font they want to read in. What they don’t say is that the reader also removes any italics and bolding, centering and so on as well. All paragraphs are reduced to the same as are all headers. The FAQ does claim that the reader will display images, but I am unable to get it to do that. I think the reader software just goes through and strips out any html tags it finds, replacing any paragraph tags with <p> and header tags with <hX>, X ranging from 1 to 6.
And then, just to make it look like it’s an early piece of software, it displays the xhtml file’s title on the page. Text between the title tags in the header section is usually displayed in the top banner of the browser’s window and in the title bar of tabs, if your browser has tabs. This looks to me likes it’s there to help the programmers debug their code by showing which xhtml file is being displayed. And on top of that, the reader doesn’t use the table of contents file (toc.ndx). It looks at each xhtml file, and if it finds Chapter (I suspect in the title, but it could look for a header at the top of the text), it puts that into the list of chapters that you can navigate to. My prologues and epilogues do not show up, nor do any other headings or titles. For example, I have converted my One Giant Leap collection of short stories into epub format and Stanza Desktop shows an empty list for chapters.
Not that it matters. Clicking on any of the chapters in the list will only take you back to the start of the book.
One Giant Leap has several images scattered through it and both Callibre and Digital Editions display them perfectly, but Stanza doesn’t. I had hoped that I could check what my ebooks would look like on iphones by using Stanza Desktop as the Stanza ap is the most used epub reader on iphones, but I will have to assume that the Stanza ap works properly and is nothing like Stanza desktop. From what I’ve read, Stanza ap is supposed to look great.
Currently, my four ebooks have passed lulu’s checks and been submitted to Apple for inclusion in the iBookstore at a price of $US 9.99. The wait is 4-6 weeks. If they pass, I’ll report on that.
And that’s it for me.

1 comment:
Well done! May I share two comments? A common problem is that many reading devices ignore your 〈p〉 tags. I don't know why, but it explains why important formatting doesn't appear. Important formatting can be forced by using 〈span〉 tags, which are almost always respected.
For font size, always use font %, not literal point sizes. When a reader changes the font size, all text and headings will adjust proportionally.
I agree, Stanza Desktop is stunningly ugly. But it gets books onto the iPhone easily, and they look great there.
We help people with ePub questions and can fix ePubs that don't pass ePubCheck.
Post a Comment